Appearance
webpack 中的 plugin
介绍
plugin 赋予其各种灵活的功能,例如打包优化、资源管理、环境变量注入等,它们会运行在 webpack 的不同阶段(钩子 / 生命周期),贯穿了 webpack 整个编译周期
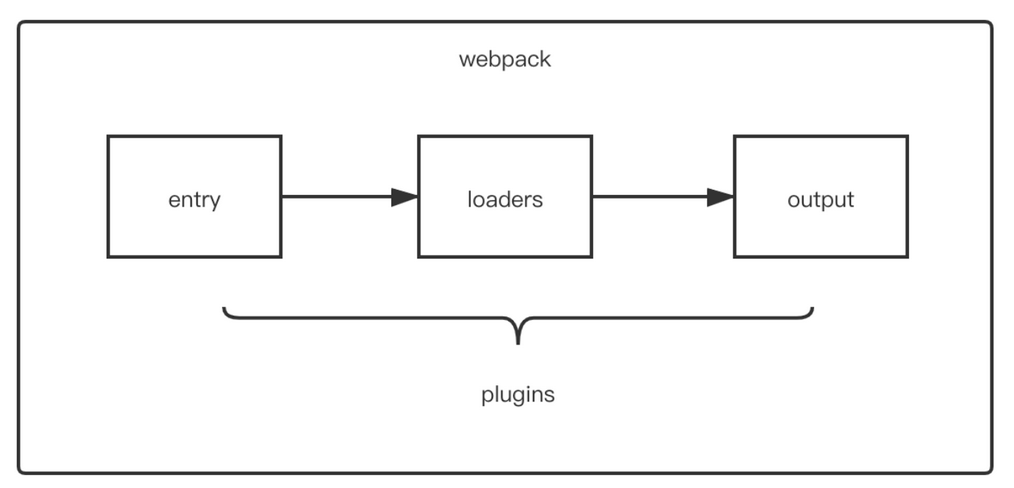
目的在于解决 loader 无法实现的其他事
配置方式
这里讲述文件的配置方式,一般情况,通过配置文件导出对象中 plugins 属性传入 new 实例对象。如下所示:
js
const HtmlWebpackPlugin = require('html-webpack-plugin'); // 通过 npm 安装
const webpack = require('webpack'); // 访问内置的插件
module.exports = {
  ...
  plugins: [
    new webpack.ProgressPlugin(),
    new HtmlWebpackPlugin({ template: './src/index.html' }),
  ],
};
特性
其本质是一个具有apply方法javascript对象
apply 方法会被 webpack compiler 调用,并且在整个编译生命周期都可以访问 compiler 对象
js
const pluginName = 'ConsoleLogOnBuildWebpackPlugin'

class ConsoleLogOnBuildWebpackPlugin {
  apply(compiler) {
    compiler.hooks.run.tap(pluginName, (compilation) => {
      console.log('webpack 构建过程开始!')
    })
  }
}

module.exports = ConsoleLogOnBuildWebpackPlugin
compiler hook 的 tap 方法的第一个参数,应是驼峰式命名的插件名称
关于整个编译生命周期钩子,有如下:
- entry-option :初始化 option
- run
- compile: 真正开始的编译,在创建 compilation 对象之前
- compilation :生成好了 compilation 对象
- make 从 entry 开始递归分析依赖,准备对每个模块进行 build
- after-compile: 编译 build 过程结束
- emit :在将内存中 assets 内容写到磁盘文件夹之前
- after-emit :在将内存中 assets 内容写到磁盘文件夹之后
- done: 完成所有的编译过程
- failed: 编译失败的时候
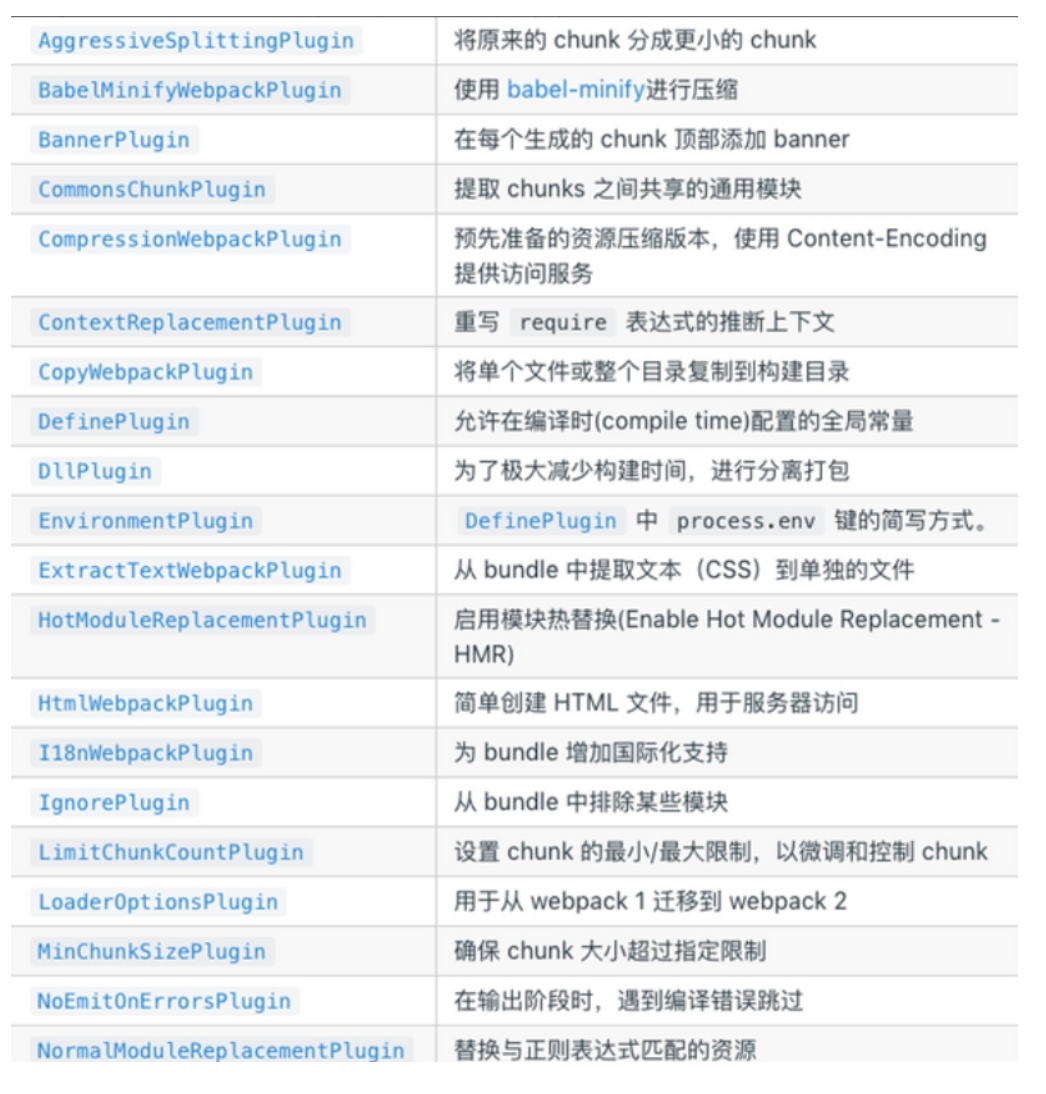
常见的 plugin
HtmlWebpackPlugin
在打包结束后,⾃动生成⼀个 html ⽂文件,并把打包生成的 js 模块引⼊到该 html 中
sh
npm install --save-dev html-webpack-pluginjs
// webpack.config.js
const HtmlWebpackPlugin = require("html-webpack-plugin");
module.exports = {
 ...
  plugins: [
     new HtmlWebpackPlugin({
       title: "My App",
       filename: "app.html",
       template: "./src/html/index.html"
     })
  ]
};
html
<!--./src/html/index.html-->
<!DOCTYPE html>
<html lang="en">
  <head>
    <meta charset="UTF-8" />
    <meta name="viewport" content="width=device-width, initial-scale=1.0" />
    <meta http-equiv="X-UA-Compatible" content="ie=edge" />
    <title><%=htmlWebpackPlugin.options.title%></title>
  </head>
  <body>
    <h1>html-webpack-plugin</h1>
  </body>
</html>
在 html 模板中,可以通过 <%=htmlWebpackPlugin.options.XXX%> 的方式获取配置的值
clean-webpack-plugin
删除(清理)构建目录
sh
npm install --save-dev clean-webpack-pluginjs
const {CleanWebpackPlugin} = require('clean-webpack-plugin');
module.exports = {
 ...
  plugins: [
    ...,
    new CleanWebpackPlugin(),
    ...
  ]
}
mini-css-extract-plugin
提取 CSS 到一个单独的文件中
sh
npm install --save-dev mini-css-extract-pluginjs
const MiniCssExtractPlugin = require('mini-css-extract-plugin');
module.exports = {
 ...,
  module: {
   rules: [
    {
     test: /\.s[ac]ss$/,
     use: [
      {
       loader: MiniCssExtractPlugin.loader
     },
          'css-loader',
          'sass-loader'
        ]
   }
   ]
 },
  plugins: [
    ...,
    new MiniCssExtractPlugin({
     filename: '[name].css'
    }),
    ...
  ]
}
DefinePlugin
允许在编译时创建配置的全局对象,是一个 webpack 内置的插件,不需要安装
js
const { DefinePlugun } = require('webpack')

module.exports = {
 ...
    plugins:[
        new DefinePlugin({
            BASE_URL:'"./"'
        })
    ]
}
这时候编译 template 模块的时候,就能通过下述形式获取全局对象
html
<link rel="icon" href="<%= BASE_URL%>favicon.ico>"copy-webpack-plugin
复制文件或目录到执行区域,如 vue 的打包过程中,如果我们将一些文件放到 public 的目录下,那么这个目录会被复制到 dist 文件夹中
sh
npm install copy-webpack-plugin -Djs
new CopyWebpackPlugin({
  parrerns: [
    {
      from: 'public',
      globOptions: {
        ignore: ['**/index.html']
      }
    }
  ]
})
复制的规则在 patterns 属性中设置:
- from:设置从哪一个源中开始复制
- to:复制到的位置,可以省略,会默认复制到打包的目录下
- globOptions:设置一些额外的选项,其中可以编写需要忽略的文件